
Convolutional Neural Networks (CNNs) are the secret sauce behind many of the image recognition technologies we use every day. Whether it’s identifying objects in photos or deciphering handwritten digits, CNNs have revolutionized how machines understand visual data. If you’ve ever wondered how these powerful models work, this guide will walk you through the basics of CNNs, their components, and how to implement one using Python.
What is a Convolutional Neural Network?
Think of Convolutional Neural Networks (CNNs) as specialized tools designed to handle the visual world. Just like a skilled photographer can spot intricate details in a scene that others might miss, CNNs are experts at analyzing and understanding images. Unlike regular neural networks that might get overwhelmed by the sheer amount of data in images, CNNs are built to pick up on patterns and features—like recognizing a cat’s whiskers or a dog’s spots—making them perfect for tasks like image recognition.
Inspired by the Human Brain:
Imagine how your brain processes what you see: first, it notices simple things like edges and colors, then it gradually puts together more complex details, like shapes and objects. Convolutional Neural Networks (CNNs) work in a similar way. They are inspired by this process in the brain. Just like our brain has different layers that help us understand what we’re looking at, CNNs use layers to gradually pick out and learn different features from an image. It’s like starting with a blurry sketch and refining it step-by-step until you can clearly see the full picture.
Why Not Use Traditional Neural Networks?
Traditional Neural Networks (ANNs) can also be used for image classification, but they have some limitations:
- Computational Complexity: ANNs struggle with the high-dimensional nature of image data. Training a network with large images and many channels (like RGB) can be computationally expensive.
- Spatial Relationships: ANNs may not capture spatial relationships between pixels effectively. CNNs are specifically designed to understand these spatial dependencies.
- Object Location Sensitivity: ANNs can be sensitive to the location of objects in an image. CNNs, however, are more robust to changes in object position due to their convolutional structure.
Components of a CNN
A CNN typically comprises several layers, each with a unique role in processing the image:
- Input Layer: This is where the image enters the network. Images can be grayscale or color (RGB). The pixel values are normalized to a range between 0 and 1 for better model performance.
- Convolutional Layer: The heart of a CNN, where the magic happens. This layer uses filters (or kernels) to scan the input image and extract features such as edges, shapes, and textures. For example, a 3×3 filter might detect vertical edges, while another might find horizontal lines. The result is a feature map that highlights these detected features.
Understanding Convolution:
To understand convolution, imagine a small window (the filter) sliding over the image. At each position, the filter multiplies pixel values by its weights, sums them up, and produces a single value. This process is repeated across the entire image to create the feature map.
Let’s break this down with a detailed example:
Imagine you have a small window, called a filter, that slides over an image to detect specific features. Here’s a simple example to illustrate:
Example: Edge Detection with a 3×3 Filter
- Input Image: Consider a small 5×5 grayscale image with pixel values:
1 2 3 0 0
4 5 6 1 0
7 8 9 2 0
7 8 9 2 0
0 1 2 3 0
0 0 0 4 5
- Filter: Now, let’s use a 3×3 filter designed to detect vertical edges. The filter might look like this:
-1 0 1
-1 0 1
-1 0 1
- Applying the Filter: The filter is applied to the image by systematically sliding it across every 3×3 section of the image. At each position, the filter’s values are multiplied by the corresponding pixel values in the image. These products are then summed to produce a single output value.
For example, consider applying the filter to the top-left corner of the image. Initially, the weights of each filter are set randomly. As the model trains, these weights are iteratively adjusted through backpropagation, driven by the loss function. This adjustment process enhances the model’s ability to extract meaningful features from the input, leading to more accurate predictions.
This methodical application of filters is a key step in enabling the CNN to learn and identify complex patterns within the image data. - Feature Map: As the filter slides across the entire image, it creates a new matrix called the feature map that highlights the detected edges. For our example, the feature map might look like this:
6 4 1
6 4 1
0 0 0
Each convolutional layer has its own set of filters, allowing the network to learn and recognize different aspects of the image. These features are then used by subsequent layers to make more complex classifications and predictions.
- Input Image: Consider a small 5×5 grayscale image with pixel values:
- Pooling Layer: After the convolutional layer has detected important features in an image, the pooling layer helps simplify and reduce the size of the feature map. This makes processing faster and less demanding on resources, while still keeping the crucial information.
How Pooling Works:
- Purpose: The pooling layer reduces the size of the feature map to speed up computations and prevent overfitting, which happens when the model becomes too focused on small details.
- Max Pooling Example:
- Imagine a 4×4 grid of numbers, representing our feature map.
- We use a 2×2 window that moves across this grid.
- For each 2×2 block, we pick the highest number. This reduces each block to a single value.
Before Pooling:
1 3 2 4
5 6 1 2
7 8 2 3
2 3 1 4
After Max Pooling:
6 4
8 4
Here, we replaced each 2×2 block with its maximum value, creating a smaller but still informative feature map.
Benefits :
- Speeds Up Processing: Smaller maps mean less data to handle.
- Reduces Overfitting: Keeps only the most important features, making the model more generalizable.
- Increases Robustness: Helps the model recognize features even if they shift slightly in the image.
In essence, the pooling layer helps make CNNs more efficient and effective by summarizing key features and reducing the complexity of the data.
- Fully Connected Layer: : This layer is where the CNN makes its final decision. It connects the features extracted by previous layers to the output categories. For instance, if the task is to classify images into different categories, the fully connected layer will assign probabilities to each class based on the features.
Putting It All Together:
The fully connected layer uses the features from previous layers to classify the image into one of the predefined categories. It’s similar to how, after analyzing various aspects of an image, you make a final decision about what it represents.
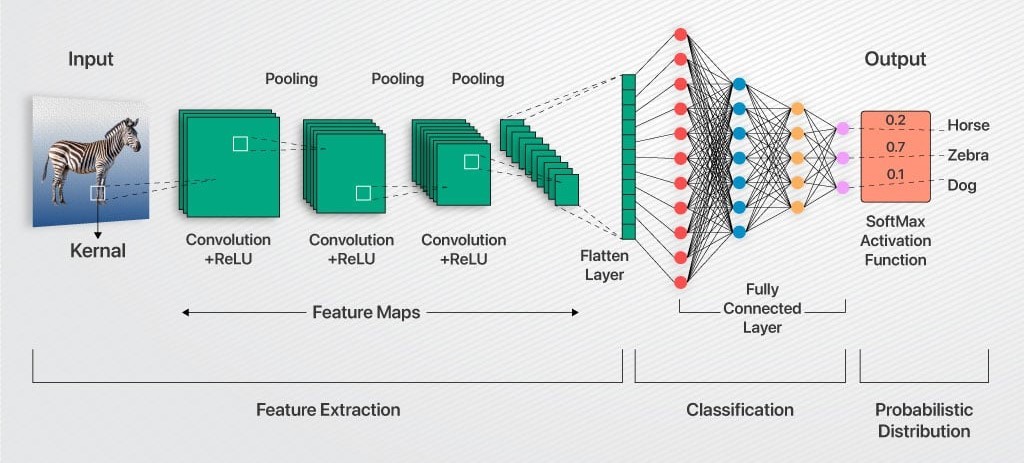
Image: Architecture of CNN
A Streamlined Approach to CNN Implementation in Python
Let’s see how to bring these concepts to life with a practical example using the MNIST dataset—a classic dataset of handwritten digits.
Importing Libraries and Loading Data:
First, we need to import necessary libraries and load our dataset. We reshape the images and normalize pixel values to prepare them for training.
- Building the Model: We define our CNN model using Python’s PyTorch library. The model includes:
- Convolutional Layer: To extract features from the images.
- Pooling Layer: To reduce the size of the feature maps.
- Fully Connected Layers: To make the final classification.
- Training the Model: We compile the model, specifying the loss function and optimizer. Then we fit the model on our training data, adjusting weights based on the error.
- Evaluating the Model: After training, we evaluate the model’s performance on test data to see how well it classifies unseen images.
Wrapping Up
CNNs are powerful tools that have transformed how we approach image recognition. They work by extracting features through convolutional layers, reducing complexity with pooling layers, and making predictions with fully connected layers. With the basics of CNNs covered, you’re now equipped to dive deeper into more advanced topics like padding, data augmentation, and hyperparameter tuning in future explorations.
 From Chaos to Clarity: The Ultimate Guide to Automating Financial Reports with VBA
 Did You Know You Can Launch an MVP in 30 Days? Here's How!
 Mastering Business Intelligence Dashboards: Excel Techniques You Need to Know
 Turning Excel into a Scalable Business Tool: A Step-by-Step Guide
 The Psychology Behind Intuitive UX: How to Design for User Comfort
 What Makes a Good MVP? Essential Tips for First-Time Founders
 How to Increase User Retention with Game Mechanics in Your App
 Excel Automation for Non-Technical Teams: A Beginner's Guide
 How AI Is Transforming ERP Systems for SMEs
 Why UX Is the Silent Salesperson in Every App